Properly sealing around a window air conditioner is essential for energy efficiency, comfort, and preventing damage to both the AC unit and your home. Gaps let in hot air, bugs, moisture, and allergens, reducing cooling performance and increasing utility bills. This expert guide covers step-by-step methods, recommended materials, troubleshooting, and safety tips to ensure your window AC is sealed for optimal year-round results.
Why Sealing Around a Window AC Is Crucial
Sealing the gaps around your window air conditioner delivers multiple benefits:
- Improves cooling performance by preventing cold air from escaping and warm air from entering.
- Reduces energy costs by lessening the AC’s workload.
- Blocks pests, dust, and allergens from invading your home.
- Prevents water leaks and structural damage caused by rain or condensation seeping in around the unit.
- Minimizes street noise and maintains indoor air quality.
Common Problems From Poorly Sealed AC Units
When a window air conditioner is not properly sealed, homeowners face several problems:
- Higher electric bills due to energy waste.
- Uncomfortable indoor temperatures with persistent hot spots.
- Mold and mildew growth from moisture intrusion.
- Pest infestations as insects crawl through gaps.
- Irreversible window or wall damage caused by leaks.
Types of Gaps Around Window Air Conditioners
Window air conditioners create several types of openings when installed:
- Side gaps: Between window sashes and AC cabinet edges.
- Top or bottom gaps: Where the unit does not fit snugly against the sash or sill.
- Accordion panel seams: Between the extendable panels and the window frame.
- Frame-to-window seam: Where metal or plastic contact window frames.
Each area may require a different sealing approach for the best results.
Best Tools and Materials to Seal Window AC Units
| Material | Description | Best For |
|---|---|---|
| Foam Weatherstripping Tape | Adhesive-backed, compressible insulation | Side/top/bottom gaps, sash contact points |
| Expandable Spray Foam | Expands to fill odd-sized gaps | Deep, irregular holes after installation |
| Silicone Caulk | Flexible, waterproof sealant | Tiny cracks, outdoor seams |
| Plexiglass or Acrylic Panels | Custom-fit rigid sheets | Large open window gaps, for extra insulation |
| Window Insulation Kits | Plastic film with adhesive, heated to shrink | Temporary/semi-permanent air sealing |
Choose material based on the size and shape of gaps around your unit for the most effective seal.
Step-by-Step Guide to Sealing a Window AC Unit
1. Inspect and Clean the Area
Begin by removing the unit if possible. Clean the window frame, sill, and sash thoroughly. Use a soft brush or vacuum to get rid of dust and debris to ensure adhesive products bond well.
2. Install the AC Unit Securely
Install the window AC according to the manufacturer’s instructions. Make sure the unit sits square in the opening, and any built-in mounting supports are secure. A stable base prevents future shifting and preserves your seal.
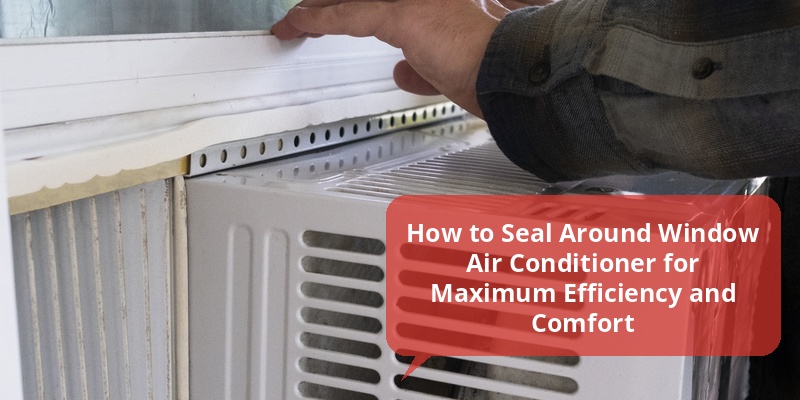
3. Seal Side, Top, and Bottom Gaps With Foam Tape
Apply adhesive-backed weatherstripping foam tape along the window sash and frame wherever the AC cabinet contacts the wood or vinyl. This seals out air and cushions vibrations.
- Choose tape thickness that compresses for a tight fit.
- Cut foam strips to length for each side.
- Press firmly for strong adhesion.
4. Address Accordion Panel Leaks
Most units come with insulated accordion side panels. Check the accordion seams for open gaps where air or bugs can leak in. Fill any visible openings with additional weatherstripping or caulk. For older/rigid panels, consider upgrading to better-fitting insulation or rigid inserts.
5. Seal Around the Panel-Frame Edges
Use clear silicone caulk to carefully seal the perimeter where the accordion panels meet the window frame. Work slowly, smoothing the sealant with a gloved finger or caulk smoothing tool for a neat finish. Allow to dry at least 24 hours before exposing to moisture.
6. Seal Exterior Joints and Large Gaps
Exterior-facing gaps—especially those under the bottom of the AC and along the outer frame—should be sealed with a combination of weatherproof caulk and expandable spray foam (for wide openings). Protect connections from rain and outdoor debris with a continuous waterproof seal.
7. Consider Plexiglass or Acrylic Panels for Extra Insulation
If installing the unit in a larger window, you may have a major gap above or beside the AC. Have plexiglass or acrylic panels custom cut to size for a snug fit. Seal edges with weatherstripping and caulk. This method is especially efficient for vertical or double-hung windows.
8. Final Checks and Maintenance
Test seal integrity by feeling for drafts around the AC with your hand. At night, shine a flashlight from outside to check for light leaks. Reapply sealing materials as needed each season. Inspect after heavy storms for damage or leaks and fix immediately for continued protection.
Sealing Tips for Different Window and AC Types
Double-Hung Windows
Double-hung windows are the most common type for window AC installations. Ensure sashes are locked to prevent shifting and check both above and below the AC for light or air leaks. Use layered foam tape for deep sills.
Slider and Casement Windows
Slider or casement windows may require custom solutions. Consider clear acrylic inserts or an insulated board cut to fill side or upper gaps, then seal with foam tape and caulk. Some units are specifically designed for horizontal windows—check manufacturer guidelines.
Older Homes
Older window frames may be warped, creating uneven gaps. Spray foam is effective for filling odd-shaped voids, but be careful not to overfill or block unit vents. Inspect frequently, as seasonal weather can shift sashes further.
Insulating and Sealing for Winter Months
If you keep your AC installed year-round:
- Use a heavy-duty, waterproof AC cover outside to block ice and drafts.
- Apply a window insulation kit over the unit from the inside for an air-tight barrier.
- Reinforce side panels with extra weatherstripping if needed.
Removing the AC for winter is ideal, but if not possible, these steps help in protecting your home and saving energy.
How to Troubleshoot Common Sealing Issues
| Problem | Possible Cause | Fix |
|---|---|---|
| Drafts/Loss of Cooling | Old/damaged weatherstripping, loose panels | Remove and replace foam tape, reseal panels |
| Moisture/Leaks | Insufficient caulking, clogged drain, gaps in sill | Apply waterproof silicone, check drainage, use spray foam for large gaps |
| Pests Found Inside | Accordion panel gaps, frame cracks | Seal with tape, caulk, or replace panels |
| Noise Intrusion | Poor window/AC fit, thin panels | Upgrade insulation, use acrylic inserts, add extra layers |
Safety Considerations When Sealing AC Units
Always make sure your air conditioner is securely installed before sealing, to prevent falls or shifting. When using spray foam or caulk, ensure the area is well-ventilated and follow product instructions. Wear gloves, eyewear, and a mask when working with chemicals or insulation. Do not block air vents—oversealing can affect the AC’s operation.
Energy Savings Potential and Environmental Impact
Efficiently sealed window air conditioners can cut cooling costs by up to 20% or more. By preventing air leaks, your unit doesn’t work as hard, reduces greenhouse gas emissions from power plants, and extends the lifespan of the equipment. Investing in proper sealing pays for itself quickly through utility savings and improved comfort.
Recommended Products for Sealing Around Window AC Units
- Frost King Rubber Foam Weatherseal Tape: Budget-friendly and easy to install.
- 3M Interior Transparent Weather Sealing Tape: Clear and non-obtrusive for inside seams.
- Great Stuff Big Gap Filler Spray Foam: Ideal for deep, irregular spaces.
- GE Silicone 2+ Window & Door Caulk: Long-lasting, waterproof sealant.
- Duck Brand Window Insulation Kit: For added winter air sealing.
- Custom-cut Plexiglass or Acrylic Sheets: For larger window or non-standard gaps.
Professional Help vs. DIY: When to Call an Expert
Sealing a window AC is often a straightforward DIY project for most homeowners. However, consider hiring a professional if:
- Your window structure is severely damaged or rotted.
- There is extensive water leakage or mold.
- The AC does not fit securely and could potentially fall.
- Historic or custom windows require special treatment.
Experts can ensure a durable, code-compliant result that safeguards your investment.
Frequently Asked Questions About Sealing Window AC Units
Should I Seal My AC’s Drainage Vents?
No—leave any drainage holes or downward-facing vents open and clear. Restricting airflow and drainage risks damaging the unit and causing water back-ups. Only seal around non-functional gaps.
How Often Should I Replace Foam Weatherstripping?
Inspect it every season and reapply if it looks crushed, brittle, or no longer forms a seal. Most weatherstripping lasts 2–4 years, depending on material and climate.
Can Using Too Much Spray Foam Harm My AC?
Yes—use spray foam carefully and sparingly. Over-expansion can push against electrical wiring or block unit components. Trim any excess once cured for a neat, effective seal.
Will Sealing Keep Out All Pests?
A properly sealed AC greatly reduces pest entry, but very small insects may still find access. Use screens in conjunction with sealing for added protection.
What’s the Easiest Solution for Temporary AC Installation?
Select removable foam tape and a window insulation kit for an efficient, non-permanent option. These can be easily stripped off at the end of the season without damaging window trim.